Beyond the Basics
In Basics, you learned how to set up BeagleBone Black, and Sensors, Displays and Other Outputs, and Motors showed how to interface to the physical world. The remainder of the book moves into some more exciting advanced topics, and this chapter gets you ready for them.
The recipes in this chapter assume that you are running Linux on your host computer (Selecting an OS for Your Development Host Computer) and are comfortable with using Linux. We continue to assume that you are logged in as debian on your Bone.
Running Your Bone Standalone
Problem
You want to use BeagleBone Black as a desktop computer with keyboard, mouse, and an HDMI display.
Solution
The Bone comes with USB and a microHDMI output. All you need to do is connect your keyboard, mouse, and HDMI display to it.
To make this recipe, you will need:
Standard HDMI cable and female HDMI-to-male microHDMI adapter, or
MicroHDMI-to-HDMI adapter cable
HDMI monitor
USB keyboard and mouse
Powered USB hub
Note
The microHDMI adapter is nice because it allows you to use a regular HDMI cable with the Bone. However, it will block other ports and can damage the Bone if you aren’t careful. The microHDMI-to-HDMI cable won’t have these problems.
Tip
You can also use an HDMI-to-DVI cable and use your Bone with a DVI-D display.
The adapter looks something like Female HDMI-to-male microHDMI adapter.
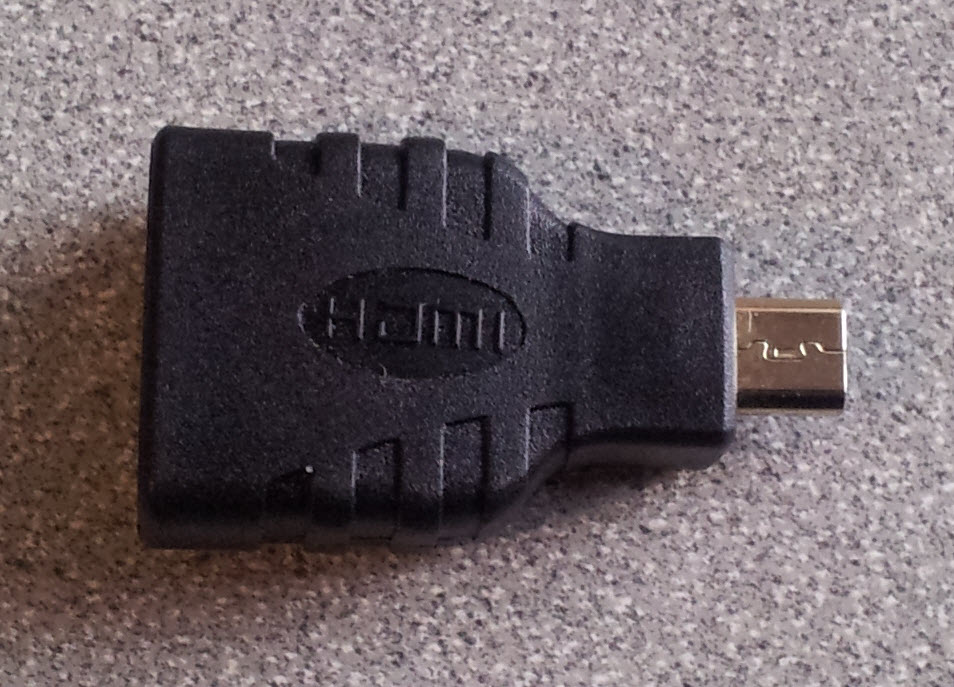
Fig. 393 Female HDMI-to-male microHDMI adapter
Plug the small end into the microHDMI input on the Bone and plug your HDMI cable into the other end of the adapter and your monitor. If nothing displays on your Bone, reboot.
If nothing appears after the reboot, edit the /boot/uEnv.txt file. Search for the line containing
disable_uboot_overlay_video=1 and make sure it’s commented out:
###Disable auto loading of virtual capes (emmc/video/wireless/adc)
#disable_uboot_overlay_emmc=1
#disable_uboot_overlay_video=1
Then reboot.
The /boot/uEnv.txt file contains a number of configuration commands that are executed at boot time.
The # character is used to add comments; that is, everything to the right of a +# is ignored by the
Bone and is assumed to be for humans to read. In the previous example, ###Disable auto loading is
a comment that informs us the next line(s) are for disabling things. Two disable_uboot_overlay
commands follow. Both should be commented-out and won’t be executed by the Bone.
Why not just remove the line? Later, you might decide you need more general-purpose input/output
(GPIO) pins and don’t need the HDMI display. If so, just remove the # from the disable_uboot_overlay_video=1
command. If you had completely removed the line earlier, you would have to look up the details somewhere to re-create it.
When in doubt, comment-out don’t delete.
Note
If you want to re-enable the HDMI audio, just comment-out the line you added.
The Bone has only one USB port, so you will need to get either a keyboard with a USB hub or a USB hub. Plug the USB hub into the Bone and then plug your keyboard and mouse in to the hub. You now have a Beagle workstation no host computer is needed.
Tip
A powered hub is recommended because USB can supply only 500 mA, and you’ll want to plug many things into the Bone.
This recipe disables the HDMI audio, which allows the Bone to try other resolutions. If this fails, see BeagleBoneBlack HDMI for how to force the Bone’s resolution to match your monitor.
Selecting an OS for Your Development Host Computer
Problem
Your project needs a host computer, and you need to select an operating system (OS) for it.
Solution
For projects that require a host computer, we assume that you are running Linux Ubuntu 22.04 LTS. You can be running either a native installation, through Windows Subsystem for Linux, via a virtual machine such as VirtualBox, or in the cloud (Microsoft Azure or Amazon Elastic Compute Cloud, EC2, for example).
Recently I’ve been preferring Windows Subsystem for Linux.
Getting to the Command Shell via SSH
Problem
You want to connect to the command shell of a remote Bone from your host computer.
Solution
Running Python and JavaScript Applications from Visual Studio Code shows how to run shell commands in the Visual Studio Code bash tab. However, the Bone has Secure Shell (SSH) enabled right out of the box, so you can easily connect by using the following command to log in as user debian, (note the $ at the end of the prompt):
host$ ssh debian@192.168.7.2
Warning: Permanently added '192.168.7.2' (ED25519) to the list of known hosts.
Debian GNU/Linux 11

BeagleBoard.org Debian Bullseye IoT Image 2023-06-03
Support: https://bbb.io/debian
default username:password is [debian:temppwd]


The programs included with the Debian GNU/Linux system are free software;
the exact distribution terms for each program are described in the
individual files in /usr/share/doc/*/copyright.

Debian GNU/Linux comes with ABSOLUTELY NO WARRANTY, to the extent
permitted by applicable law.
Last login: Thu Jun  8 14:02:40 2023 from 192.168.7.1
bone$
Default password
debian has the default password temppwd. It’s best to change the password:
bone$ password
Changing password for debian.
(current) UNIX password:
Enter new UNIX password:
Retype new UNIX password:
password: password updated successfully
Removing the Message of the Day
Problem
Every time you login a long message is displayed that you don’t need to see.
Solution
The contents of the files /etc/motd, /etc/issue and /etc/issue.net are displayed everytime you long it. You can prevent them from being displayed by moving them elsewhere.
bone$ sudo mv /etc/motd /etc/motd.orig
bone$ sudo mv /etc/issue /etc/issue.orig
bone$ sudo mv /etc/issue.net /etc/issue.net.orig
Now, the next time you ssh in they won’t be displayed.
Getting to the Command Shell via the Virtual Serial Port
Problem
You want to connect to the command shell of a remote Bone from your host computer without using SSH.
Solution
Sometimes, you can’t connect to the Bone via SSH, but you have a network working over USB to the Bone. There is a way to access the command line to fix things without requiring extra hardware. (Viewing and Debugging the Kernel and u-boot Messages at Boot Time shows a way that works even if you don’t have a network working over USB, but it requires a special serial-to-USB cable.)
Note
This method doesn’t work with WSL.
First, check to ensure that the serial port is there. On the host computer, run the following command:
host$ ls -ls /dev/ttyACM0
0 crw-rw---- 1 root dialout 166, 0 Jun 19 11:47 /dev/ttyACM0
/dev/ttyACM0 is a serial port on your host computer that the Bone creates when it boots up. The letters crw-rw—- show that you can’t access it as a normal user. However, you can access it if you are part of dialout group. See if you are in the dialout group:
host$ groups
yoder adm tty uucp dialout cdrom sudo dip plugdev lpadmin sambashare
Looks like I’m already in the group, but if you aren’t, just add yourself to the group:
host$ sudo adduser $USER dialout
You have to run adduser only once. Your host computer will remember the next time you boot up. Now, install and run the screen command:
host$ sudo apt install screen
host$ screen /dev/ttyACM0 115200
Debian GNU/Linux 7 beaglebone ttyGS0

default username:password is [debian:temppwd]

Support/FAQ: http://elinux.org/Beagleboard:BeagleBoneBlack_Debian

The IP Address for usb0 is: 192.168.7.2
beaglebone login:
The /dev/ttyACM0 parameter specifies which serial port to connect to, and 115200
tells the speed of the connection. In this case, it’s 115,200 bits per second.
Viewing and Debugging the Kernel and u-boot Messages at Boot Time
Problem
You want to see the messages that are logged by BeagleBone Black as it comes to life.
Solution
There is no network in place when the Bone first boots up, so Getting to the Command Shell via SSH and Getting to the Command Shell via the Virtual Serial Port won’t work. This recipe uses some extra hardware (FTDI cable) to attach to the Bone’s console serial port.
To make this recipe, you will need:
3.3 V FTDI cable
Warning
Be sure to get a 3.3 V FTDI cable (shown in FTDI cable), because the 5 V cables won’t work.
Tip
The Bone’s Serial Debug J1 connector has Pin 1 connected to ground, Pin 4 to receive, and Pin 5 to transmit. The other pins are not attached.
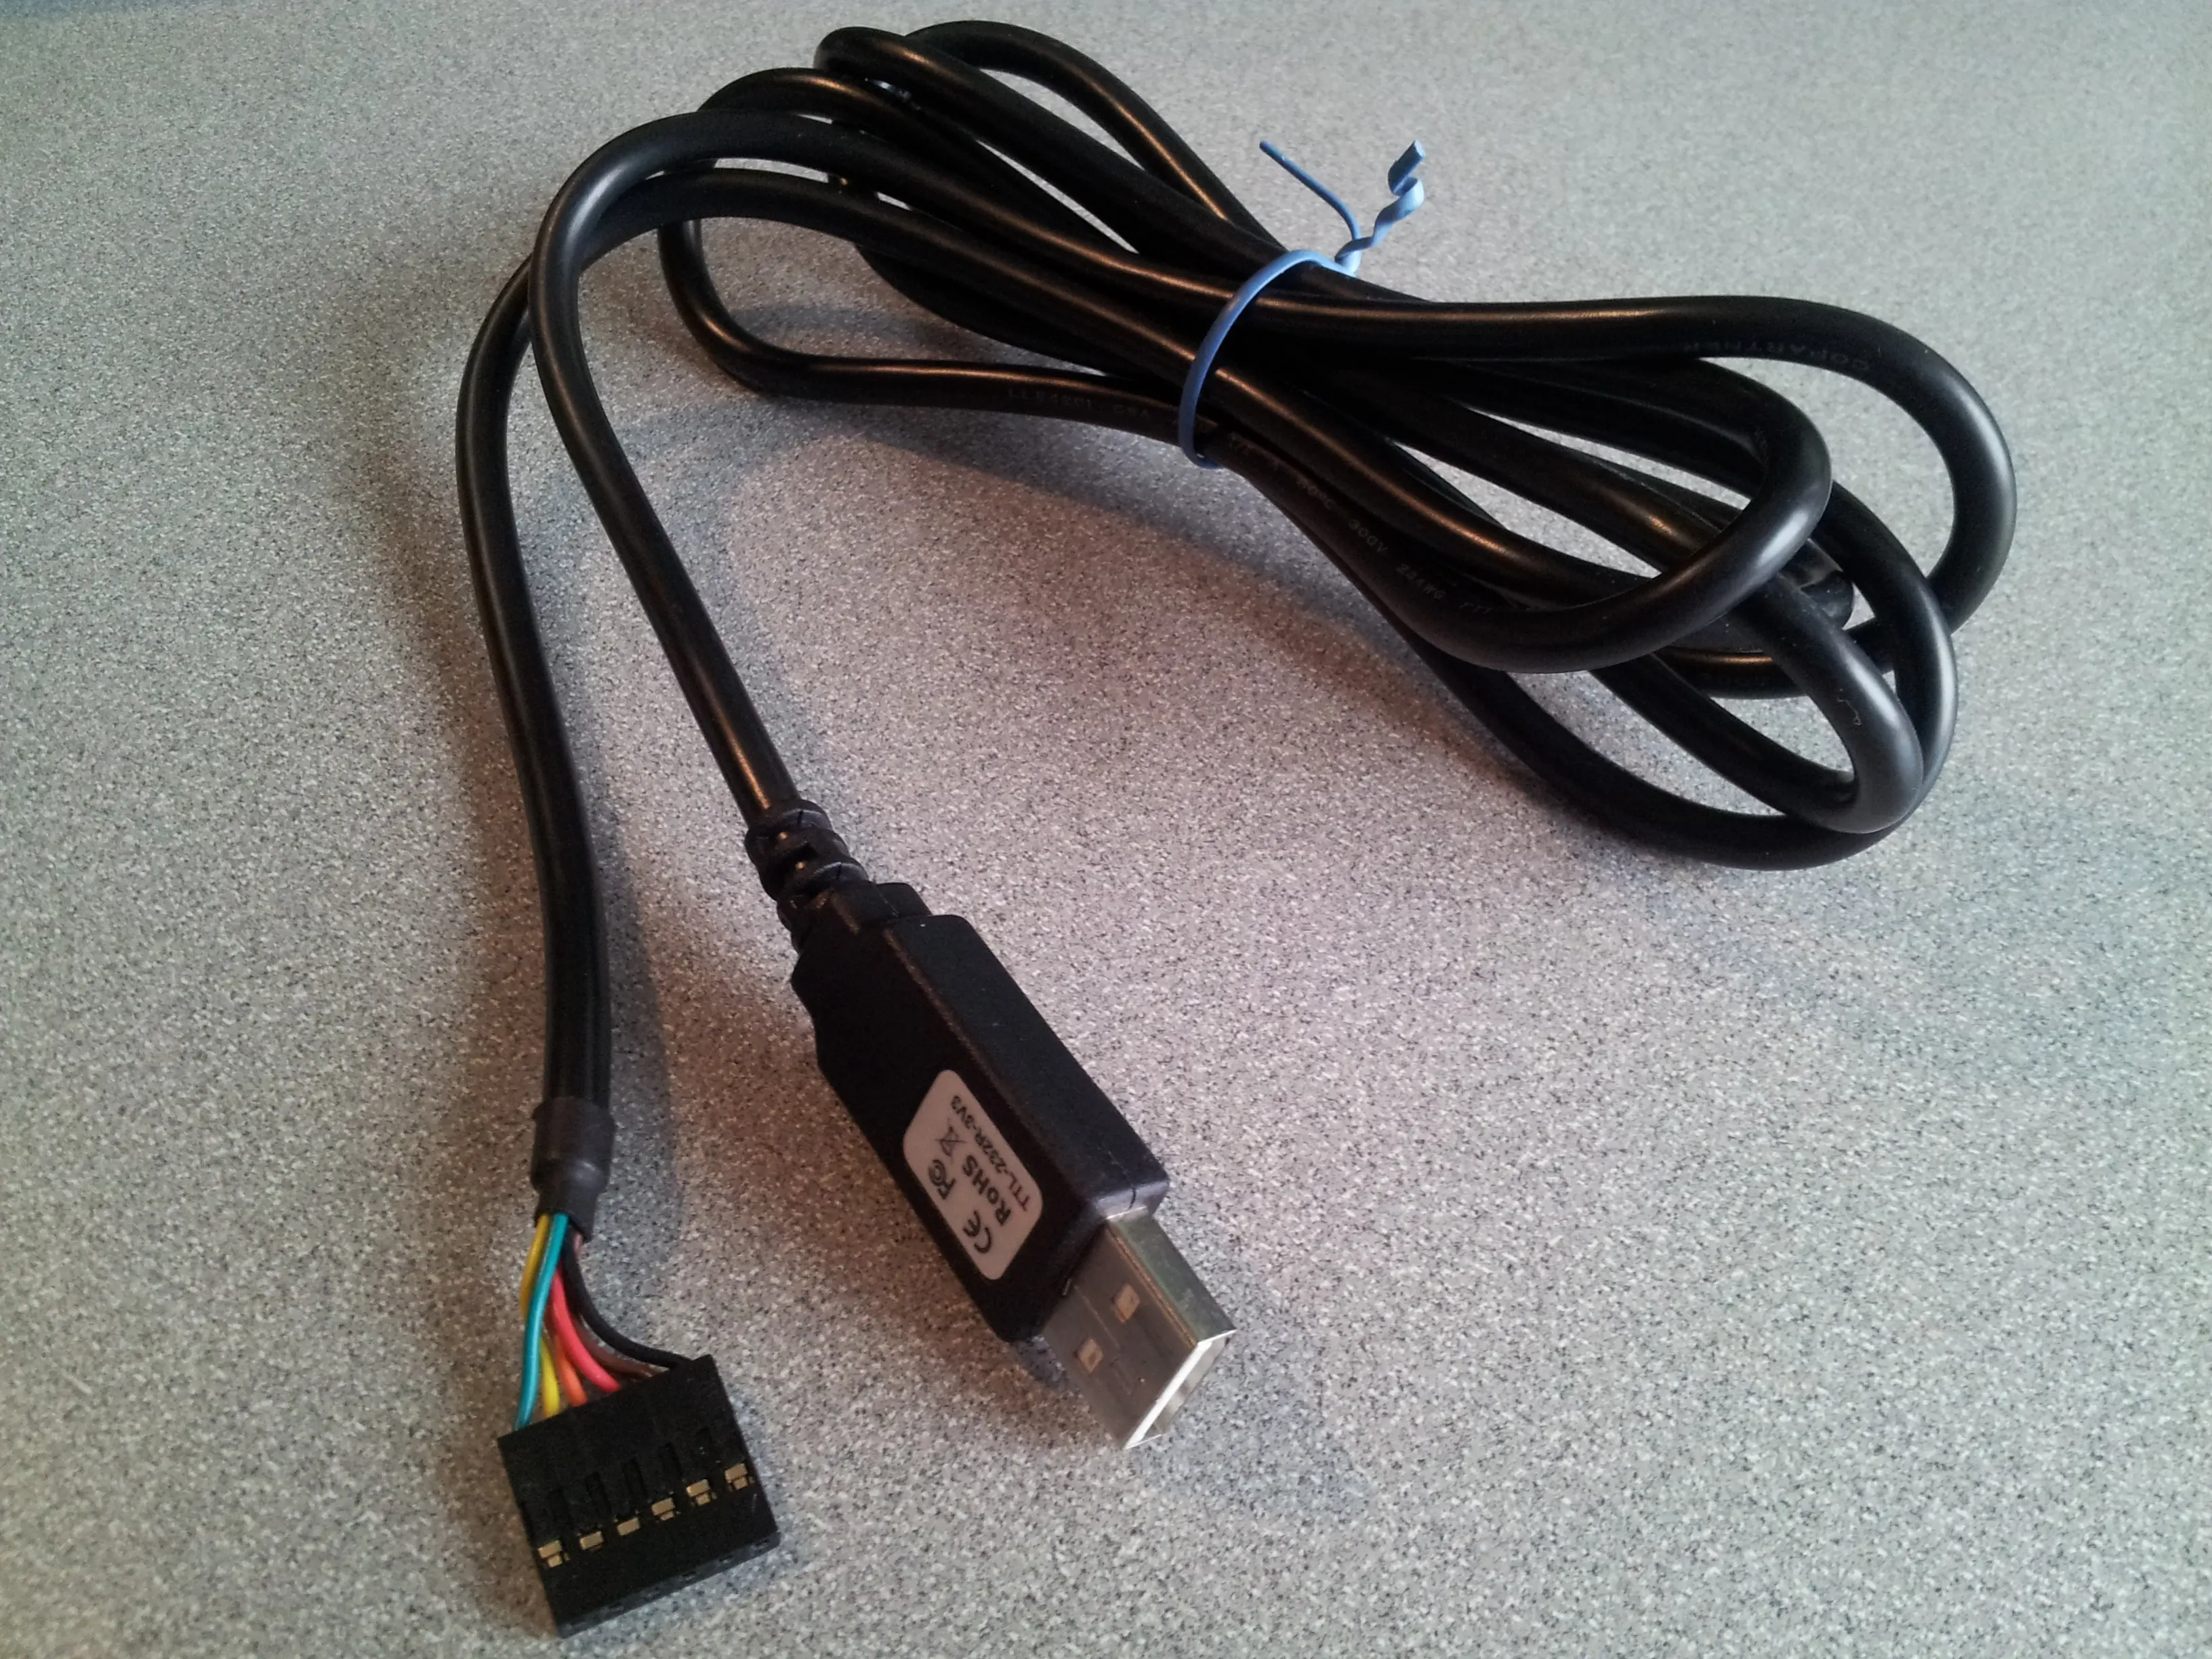
Fig. 394 FTDI cable
Look for a small triangle at the end of the FTDI cable (FTDI connector). It’s often connected to the black wire.
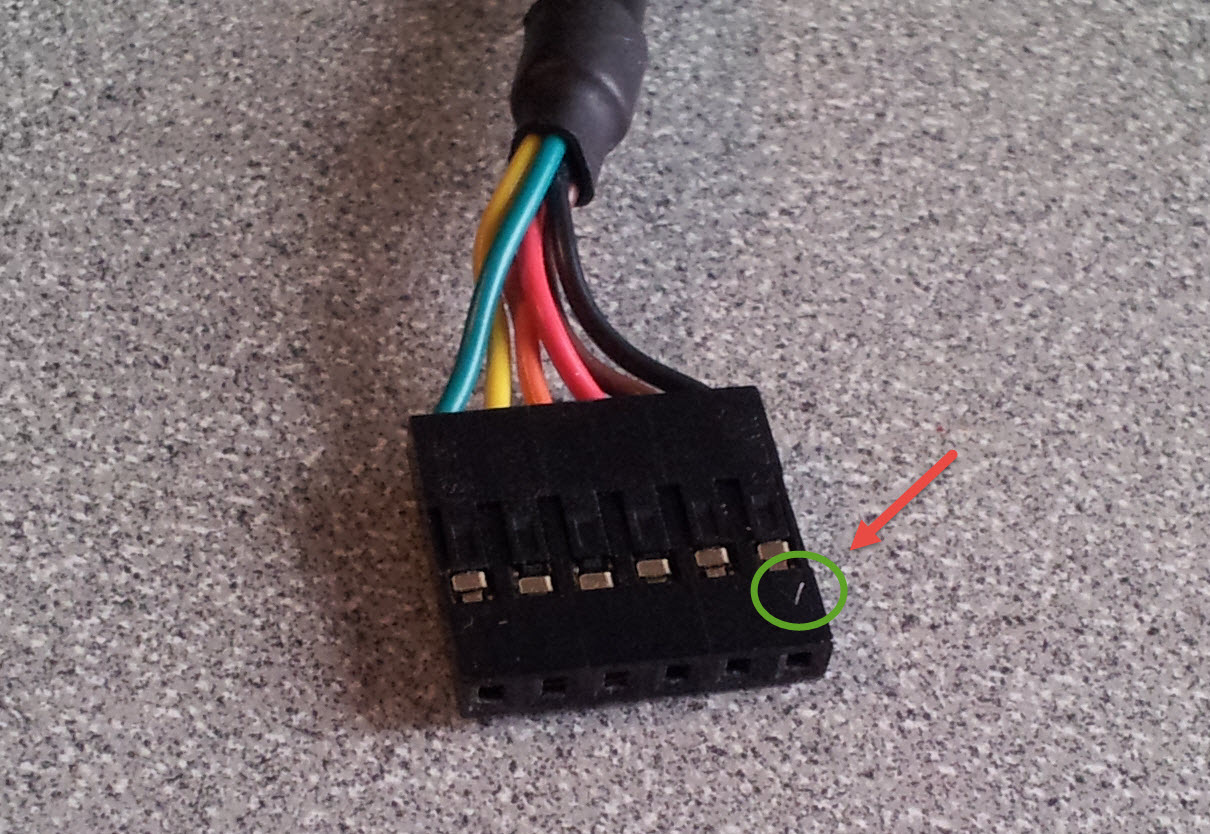
Fig. 395 FTDI connector
Next, look for the FTDI pins of the Bone (labeled J1 on the Bone), shown in FTDI pins for the FTDI connector. They are next to the P9 header and begin near pin 20. There is a white dot near P9_20.
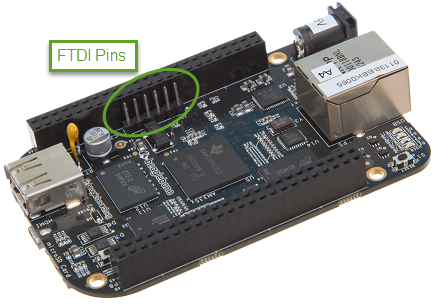
Fig. 396 FTDI pins for the FTDI connector
Plug the FTDI connector into the FTDI pins, being sure to connect
the triangle pin on the connector to the white dot pin of the FTDI connector.
Now, run the following commands on your host computer:
host$ ls -ls /dev/ttyUSB0
0 crw-rw---- 1 root dialout 188, 0 Jun 19 12:43 /dev/ttyUSB0
host$ sudo adduser $USER dialout
host$ screen /dev/ttyUSB0 115200
Debian GNU/Linux 7 beaglebone ttyO0

default username:password is [debian:temppwd]

Support/FAQ: http://elinux.org/Beagleboard:BeagleBoneBlack_Debian

The IP Address for usb0 is: 192.168.7.2
beaglebone login:
Note
Your screen might initially be blank. Press Enter a couple times to see the login prompt.
Verifying You Have the Latest Version of the OS on Your Bone from the Shell
Problem
You are logged in to your Bone with a command prompt and want to know what version of the OS you are running.
Solution
Log in to your Bone and enter the following command:
bone$ cat /etc/dogtag
BeagleBoard.org Debian Bullseye IoT Image 2023-06-03
Verifying You Have the Latest Version of the OS on Your Bone shows how to open the /etc/dogtag file to see the OS version.
See Running the Latest Version of the OS on Your Bone if you need to update your OS.
Controlling the Bone Remotely with a VNC
Problem
You want to access the BeagleBone’s graphical desktop from your host computer.
Solution
Install and run a Virtual Network Computing (VNC) server:
bone$ sudo apt update
bone$ sudo apt install tightvncserver
Reading package lists... Done
Building dependency tree... Done
Reading state information... Done
The following additional packages will be installed:
...
update-alternatives: using /usr/bin/Xtightvnc to provide /usr/bin/Xvnc (Xvnc) in auto mode
update-alternatives: using /usr/bin/tightvncpasswd to provide /usr/bin/vncpasswd (vncpasswd) in auto mode
Processing triggers for libc-bin (2.31-13+deb11u6) ...

bone$ tightvncserver

You will require a password to access your desktops.

Password:
Verify:
Would you like to enter a view-only password (y/n)? n
xauth: (argv):1:  bad display name "beaglebone:1" in "add" command

New 'X' desktop is beaglebone:1

Creating default startup script /home/debian/.vnc/xstartup
Starting applications specified in /home/debian/.vnc/xstartup
Log file is /home/debian/.vnc/beagleboard:1.log
To connect to the Bone, you will need to run a VNC client. There are many to choose from. Remmina Remote Desktop Client is already installed on Ubuntu. Start and select the new remote desktop file button (Creating a new remote desktop file in Remmina Remote Desktop Client).
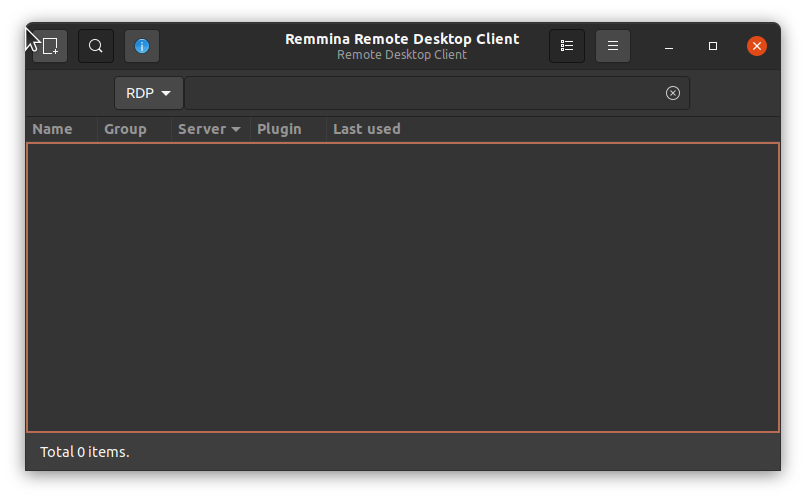
Fig. 397 Creating a new remote desktop file in Remmina Remote Desktop Client
Give your connection a name, being sure to select “Remmina VNC Plugin” Also, be sure to add :1 after the server address, as shown in Configuring the Remmina Remote Desktop Client. This should match the :1 that was displayed when you started vncserver.
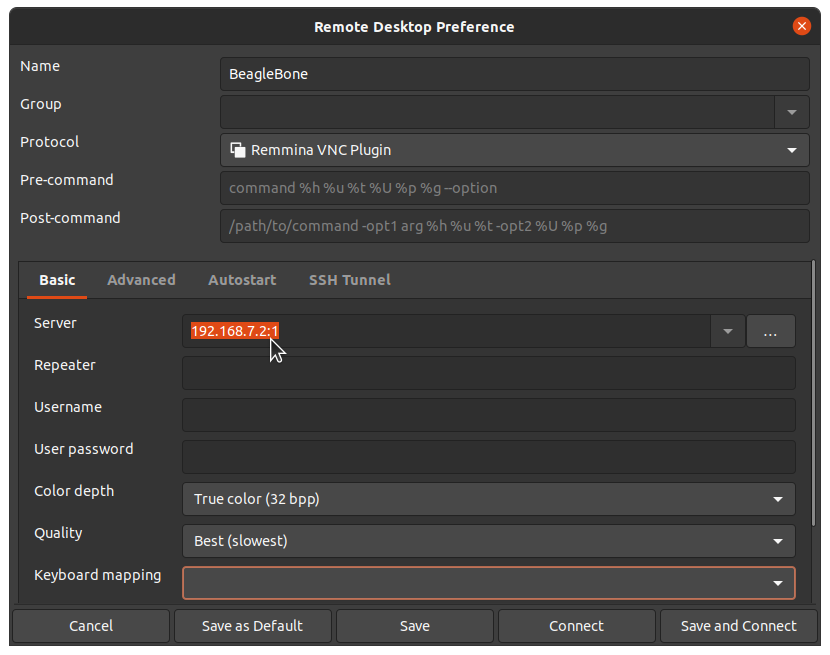
Fig. 398 Configuring the Remmina Remote Desktop Client
Click Connect to start graphical access to your Bone, as shown in The Remmina Remote Desktop Client showing the BeagleBone desktop.
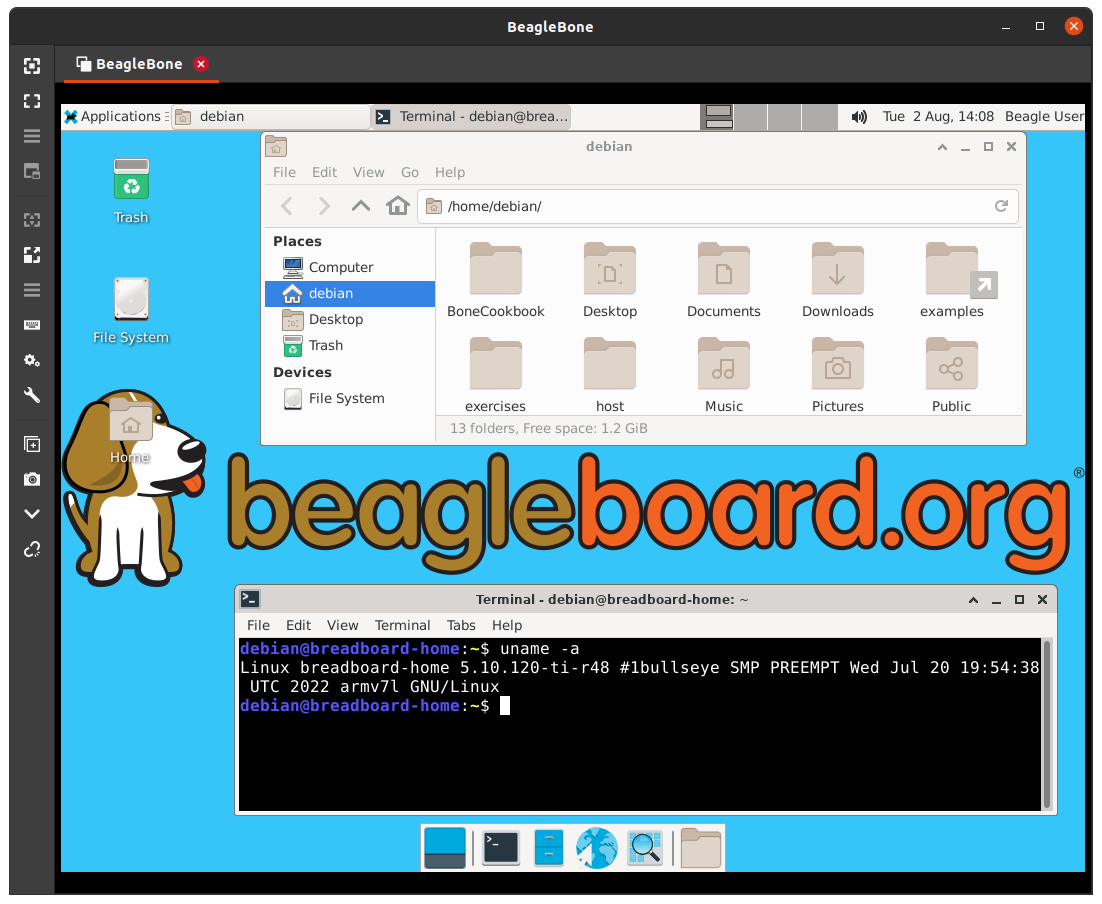
Fig. 399 The Remmina Remote Desktop Client showing the BeagleBone desktop
Tip
You might need to resize the VNC screen on your host to see the bottom menu bar on your Bone.
Note
You need to have X Windows installed and running for the VNC to work. Here’s how to install it. This needs some 250M of disk space and 19 minutes to install.
bone$ bone$ sudo apt install bbb.io-xfce4-desktop
bone$ sdo cp /etc/bbb.io/templates/fbdev.xorg.conf /etc/X11/xorg.conf
bone$ startxfce4
/usr/bin/startxfce4: Starting X server
/usr/bin/startxfce4: 122: exec: xinit: not found
Learning Typical GNU/Linux Commands
Problem
There are many powerful commands to use in Linux. How do you learn about them?
Solution
Common Linux commands lists many common Linux commands.
Command |
Action |
pwd |
show current directory |
cd |
change current directory |
ls |
list directory contents |
chmod |
change file permissions |
chown |
change file ownership |
cp |
copy files |
mv |
move files |
rm |
remove files |
mkdir |
make directory |
rmdir |
remove directory |
cat |
dump file contents |
less |
progressively dump file |
vi |
edit file (complex) |
nano |
edit file (simple) |
head |
trim dump to top |
tail |
trim dump to bottom |
echo |
print/dump value |
env |
dump environment variables |
export |
set environment variable |
history |
dump command history |
grep |
search dump for strings |
man |
get help on command |
apropos |
show list of man pages |
find |
search for files |
tar |
create/extract file archives |
gzip |
compress a file |
gunzip |
decompress a file |
du |
show disk usage |
df |
show disk free space |
mount |
mount disks |
tee |
write dump to file in parallel |
hexdump |
readable binary dumps |
whereis |
locates binary and source files |
Editing a Text File from the GNU/Linux Command Shell
Problem
You want to run an editor to change a file.
Solution
The Bone comes with a number of editors. The simplest to learn is nano. Just enter the following command:
bone$ nano file
You are now in nano (Editing a file with nano). You can’t move around the screen using the mouse, so use the arrow keys. The bottom two lines of the screen list some useful commands. Pressing ^G (Ctrl-G) will display more useful commands. ^X (Ctrl-X) exits nano and gives you the option of saving the file.

Fig. 400 Editing a file with nano
Tip
By default, the file you create will be saved in the directory from which you opened nano.
Many other text editors will run on the Bone. vi, vim, emacs, and even eclipse are all supported. See Installing Additional Packages from the Debian Package Feed to learn if your favorite is one of them.
Establishing an Ethernet-Based Internet Connection
Problem
You want to connect your Bone to the Internet using the wired network connection.
Solution
Plug one end of an Ethernet patch cable into the RJ45 connector on the Bone (see The RJ45 port on the Bone) and the other end into your home hub/router. The yellow and green link lights on both ends should begin to flash.
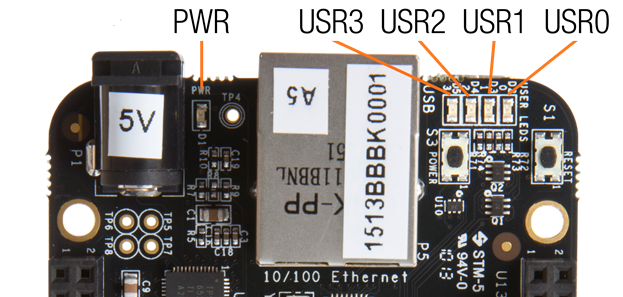
Fig. 401 The RJ45 port on the Bone
If your router is already configured to run DHCP (Dynamical Host Configuration Protocol), it will automatically assign an IP address to the Bone.
Warning
It might take a minute or two for your router to detect the Bone and assign the IP address.
To find the IP address, open a terminal window and run the ip command:
bone$ ip a
1: lo: <LOOPBACK,UP,LOWER_UP> mtu 65536 qdisc noqueue state UNKNOWN group default qlen 1000
   link/loopback 00:00:00:00:00:00 brd 00:00:00:00:00:00
   inet 127.0.0.1/8 scope host lo
      valid_lft forever preferred_lft forever
   inet6 ::1/128 scope host
      valid_lft forever preferred_lft forever
2: eth0: <BROADCAST,MULTICAST,UP,LOWER_UP> mtu 1500 qdisc mq state UP group default qlen 1000
   link/ether c8:a0:30:a6:26:e8 brd ff:ff:ff:ff:ff:ff
   inet 10.0.5.144/24 brd 10.0.5.255 scope global dynamic eth0
      valid_lft 80818sec preferred_lft 80818sec
   inet6 fe80::caa0:30ff:fea6:26e8/64 scope link
      valid_lft forever preferred_lft forever
3: usb0: <BROADCAST,MULTICAST,UP,LOWER_UP> mtu 1500 qdisc pfifo_fast state UP group default qlen 1000
   link/ether c2:3f:44:bb:41:0f brd ff:ff:ff:ff:ff:ff
   inet 192.168.7.2/24 brd 192.168.7.255 scope global usb0
      valid_lft forever preferred_lft forever
   inet6 fe80::c03f:44ff:febb:410f/64 scope link
      valid_lft forever preferred_lft forever
4: usb1: <BROADCAST,MULTICAST,UP,LOWER_UP> mtu 1500 qdisc pfifo_fast state UP group default qlen 1000
   link/ether 76:7e:49:46:1b:78 brd ff:ff:ff:ff:ff:ff
   inet 192.168.6.2/24 brd 192.168.6.255 scope global usb1
      valid_lft forever preferred_lft forever
   inet6 fe80::747e:49ff:fe46:1b78/64 scope link
      valid_lft forever preferred_lft forever
5: can0: <NOARP,ECHO> mtu 16 qdisc no-op state DOWN group default qlen 10
   link/can
6: can1: <NOARP,ECHO> mtu 16 qdisc no-op state DOWN group default qlen 10
   link/can
My Bone is connected to the Internet in two ways: via the RJ45 connection (eth0) and via the USB cable (usb0). The inet field shows that my Internet address is 10.0.5.144 for the RJ45 connector.
On my university campus, you must register your MAC address before any device will work on the network. The HWaddr field gives the MAC address. For eth0, it’s c8:a0:30:a6:26:e8.
The IP address of your Bone can change. If it’s been assigned by DHCP, it can change at any time. The MAC address, however, never changes; it is assigned to your ethernet device when it’s manufactured.
Warning
When a Bone is connected to some networks it becomes visible to the world. If you don’t secure your Bone,
the world will soon find it. See Default password and Setting Up a Firewall
On many home networks, you will be behind a firewall and won’t be as visible.
Establishing a WiFi-Based Internet Connection
Problem
You want BeagleBone Black to talk to the Internet using a USB wireless adapter.
Solution
Tip
For the correct instructions for the image you are using, go to latest-images and click on the image you are using.
I’m running Debian 11.x (Bullseye), the top one, on the BeagleBone Black.
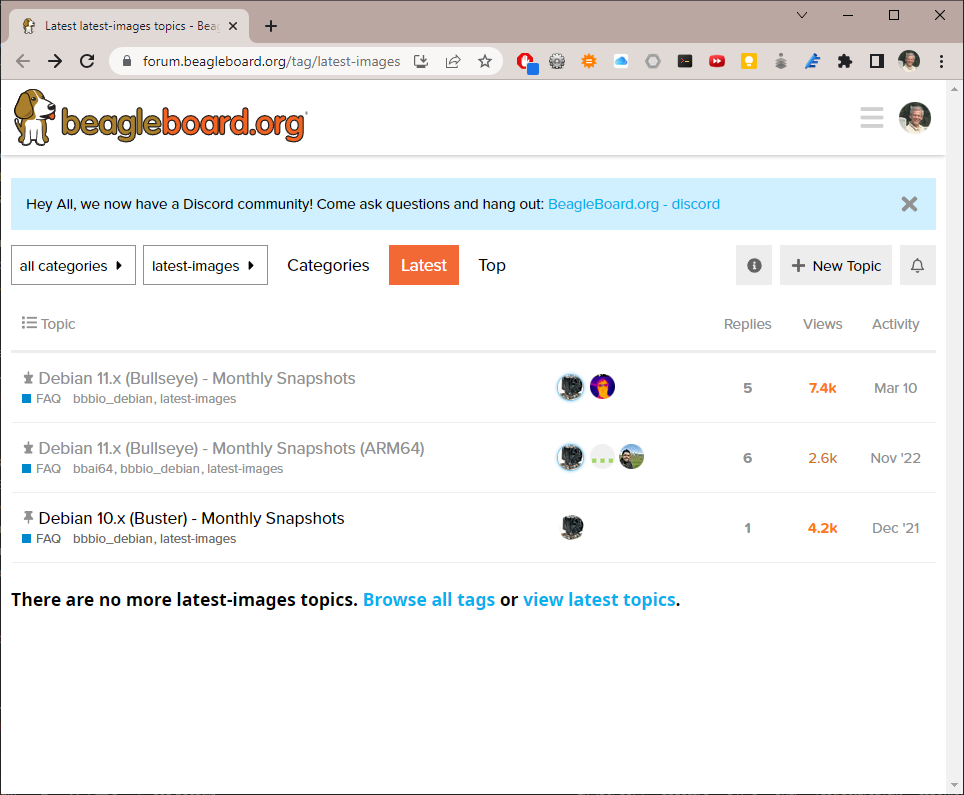
Fig. 402 Latest Beagle Images
Scroll to the top of the page and you’ll see instructions on setting up Wifi. The instructions here are based on using networkctl.

Fig. 403 Instructions for setting up your network.
Several WiFi adapters work with the Bone. Check WiFi Adapters for the latest list.
To make this recipe, you will need:
USB Wifi adapter
5 V external power supply
Warning
Most adapters need at least 1 A of current to run, and USB supplies only 0.5 A, so be sure to use an external power supply. Otherwise, you will experience erratic behavior and random crashes.
First, plug in the WiFi adapter and the 5 V external power supply and reboot.
Then run lsusb to ensure that your Bone found the adapter:
bone$ lsusb
Bus 001 Device 002: ID 0bda:8176 Realtek Semiconductor Corp. RTL8188CUS 802.11n
WLAN Adapter
Bus 001 Device 001: ID 1d6b:0002 Linux Foundation 2.0 root hub
Bus 002 Device 001: ID 1d6b:0002 Linux Foundation 2.0 root hub
Note
There is a well-known bug in the Bone’s 3.8 kernel series that prevents USB devices from being discovered when hot-plugged, which is why you should reboot. Newer kernels should address this issue.
Next, run networkctl to find your adapter’s name. Mine is called wlan0, but you might see other names, such as ra0.
bone$ networkctl
IDX LINK    TYPE     OPERATIONAL SETUP
1 lo      loopback carrier     unmanaged
2 eth0    ether    no-carrier  configuring
3 usb0    gadget   routable    configured
4 usb1    gadget   routable    configured
5 can0    can      off         unmanaged
6 can1    can      off         unmanaged
7 wlan0   wlan     routable    configured
8 SoftAp0 wlan     routable    configured

8 links listed.
If no name appears, try ip a:
bone$ ip a
...
2: eth0: <NO-CARRIER,BROADCAST,MULTICAST,UP> mtu 1500 qdisc pfifo_fast state DOWN group default qlen 1000
   link/ether c8:a0:30:a6:26:e8 brd ff:ff:ff:ff:ff:ff
3: usb0: <BROADCAST,MULTICAST,UP,LOWER_UP> mtu 1500 qdisc pfifo_fast state UP group default qlen 1000
   link/ether c2:3f:44:bb:41:0f brd ff:ff:ff:ff:ff:ff
   inet 192.168.7.2/24 brd 192.168.7.255 scope global usb0
      valid_lft forever preferred_lft forever
   inet6 fe80::c03f:44ff:febb:410f/64 scope link
      valid_lft forever preferred_lft forever
...
7: wlan0: <BROADCAST,MULTICAST,UP,LOWER_UP> mtu 1500 qdisc mq state UP group default qlen 1000
   link/ether 64:69:4e:7e:5c:e4 brd ff:ff:ff:ff:ff:ff
   inet 10.0.7.21/24 brd 10.0.7.255 scope global dynamic wlan0
      valid_lft 85166sec preferred_lft 85166sec
   inet6 fe80::6669:4eff:fe7e:5ce4/64 scope link
      valid_lft forever preferred_lft forever


Next edit the configuration file */etc/wpa_supplicant/wpa_supplicant-wlan0.conf*.
bone$ sudo nano /etc/wpa_supplicant/wpa_supplicant-wlan0.conf
In the file you’ll see:
ctrl_interface=DIR=/run/wpa_supplicant GROUP=netdev
update_config=1
#country=US

network={
     ssid="Your SSID"
     psk="Your Password"
}
Change the ssid and psk entries for your network. Save your file, then run:
bone$ sudo systemctl restart systemd-networkd
bone$  ip a
bone$ ping -c2 google.com
PING google.com (142.250.191.206) 56(84) bytes of data.
64 bytes from ord38s31-in-f14.1e100.net (142.250.191.206): icmp_seq=1 ttl=115 time=19.5 ms
64 bytes from ord38s31-in-f14.1e100.net (142.250.191.206): icmp_seq=2 ttl=115 time=19.4 ms

--- google.com ping statistics ---
2 packets transmitted, 2 received, 0% packet loss, time 1001ms
rtt min/avg/max/mdev = 19.387/19.450/19.513/0.063 ms
wlan0 should now have an ip address and you should be on the network. If not, try rebooting.
Setting Up a Firewall
Problem
You have put your Bone on the network and want to limit which IP addresses can access it.
Solution
How-To Geek has a great posting on how do use ufw, the “uncomplicated firewall”. Check out How to Secure Your Linux Server with a UFW Firewall. I’ll summarize the initial setup here.
First install and check the status:
bone$ sudo apt update
bone$ sudo apt install ufw
bone$ sudo ufw status
Status: inactive
Now turn off everything coming in and leave on all outgoing. Note, this won’t take effect until ufw is enabled.
bone$ sudo ufw default deny incoming
bone$ sudo ufw default allow outgoing
Don’t enable yet, make sure ssh still has access
bone$ sudo ufw allow 22
Just to be sure, you can install nmap on your host computer to see what ports are currently open.
host$ sudo apt update
host$ sudo apt install nmap
host$ nmap 192.168.7.2
Starting Nmap 7.80 ( https://nmap.org ) at 2022-07-09 13:37 EDT
Nmap scan report for bone (192.168.7.2)
Host is up (0.014s latency).
Not shown: 997 closed ports
PORT     STATE SERVICE
22/tcp   open  ssh
80/tcp   open  http
3000/tcp open  ppp

Nmap done: 1 IP address (1 host up) scanned in 0.19 seconds
Currently there are three ports visible: 22, 80 and 3000 (visual studio code). Now turn on the firewall and see what happens.
bone$ sudo ufw enable
Command may disrupt existing ssh connections. Proceed with operation (y|n)? y
Firewall is active and enabled on system startup


host$ nmap 192.168.7.2
Starting Nmap 7.80 ( https://nmap.org ) at 2022-07-09 13:37 EDT
Nmap scan report for bone (192.168.7.2)
Host is up (0.014s latency).
Not shown: 999 closed ports
PORT     STATE SERVICE
22/tcp   open  ssh

Nmap done: 1 IP address (1 host up) scanned in 0.19 seconds
Only port 22 (ssh) is accessible now.
The firewall will remain on, even after a reboot. Disable it now if you don’t want it on.
bone$ sudo ufw disable
Firewall stopped and disabled on system startup
See the How-To Geek article for more examples.
Installing Additional Packages from the Debian Package Feed
Problem
You want to do more cool things with your BeagleBone by installing more programs.
Solution
Warning
Your Bone needs to be on the network for this to work. See Establishing an Ethernet-Based Internet Connection, Establishing a WiFi-Based Internet Connection, or Sharing the Host’s Internet Connection over USB.
The easiest way to install more software is to use apt:
bone$ sudo apt update
bone$ sudo apt install "name of software"
A sudo is necessary since you aren’t running as root. The first command downloads package lists from various repositories and updates them to get information on the newest versions of packages and their dependencies. (You need to run it only once a week or so.) The second command fetches the software and installs it and all packages it depends on.
How do you find out what software you can install? Try running this:
bone$ apt-cache pkgnames | sort > /tmp/list
bone$ wc /tmp/list
  67974   67974 1369852 /tmp/list
bone$ less /tmp/list
The first command lists all the packages that apt knows about and sorts them and stores
them in /tmp/list. The second command shows why you want to put the list in a file.
The wc command counts the number of lines, words, and characters in a file. In our case,
there are over 67,000 packages from which we can choose! The less command displays the sorted
list, one page at a time. Press the space bar to go to the next page. Press q to quit.
Suppose that you would like to install an online dictionary (dict). Just run the following command:
bone$ sudo apt install dict
Now you can run dict.
Removing Packages Installed with apt
Problem
You’ve been playing around and installing all sorts of things with apt and now you want to clean things up a bit.
Solution
apt has a remove option, so you can run the following command:
bone$ sudo apt remove dict
Reading package lists... Done
Building dependency tree
Reading state information... Done
The following packages were automatically installed and are no longer required:
libmaa3 librecode0 recode
Use 'apt autoremove' to remove them.
The following packages will be REMOVED:
dict
0 upgraded, 0 newly installed, 1 to remove and 27 not upgraded.
After this operation, 164 kB disk space will be freed.
Do you want to continue [Y/n]? y
Copying Files Between the Onboard Flash and the MicroSD Card
Problem
You want to move files between the onboard flash and the microSD card.
Solution
If you booted from the microSD card, run the following command:
bone$ df -h
Filesystem      Size  Used Avail Use% Mounted on
rootfs          7.2G  2.0G  4.9G  29% /
udev             10M     0   10M   0% /dev
tmpfs           100M  1.9M   98M   2% /run
/dev/mmcblk0p2  7.2G  2.0G  4.9G  29% /
tmpfs           249M     0  249M   0% /dev/shm
tmpfs           249M     0  249M   0% /sys/fs/cgroup
tmpfs           5.0M     0  5.0M   0% /run/lock
tmpfs           100M     0  100M   0% /run/user
bone$ ls /dev/mmcblk*
/dev/mmcblk0    /dev/mmcblk0p2  /dev/mmcblk1boot0  /dev/mmcblk1p1
/dev/mmcblk0p1  /dev/mmcblk1    /dev/mmcblk1boot1
The df command shows what partitions are already mounted.
The line /dev/mmcblk0p2 7.2G 2.0G 4.9G 29% / shows that mmcblk0 partition p2
is mounted as /, the root file system. The general rule is that the media you’re booted from
(either the onboard flash or the microSD card) will appear as mmcblk0.
The second partition (p2) is the root of the file system.
The ls command shows what devices are available to mount. Because mmcblk0 is already mounted, /dev/mmcblk1p1 must be the other media that we need to mount. Run the following commands to mount it:
bone$ cd /mnt
bone$ sudo mkdir onboard
bone$ ls onboard
bone$ sudo mount /dev/mmcblk1p1 onboard/
bone$ ls onboard
bin   etc     lib         mnt           proc  sbin     sys  var
boot  home    lost+found  nfs-uEnv.txt  root  selinux  tmp
dev   ID.txt  media       opt           run   srv      usr
The cd command takes us to a place in the file system where files are commonly mounted.
The mkdir command creates a new directory (onboard) to be a mount point. The ls
command shows there is nothing in onboard. The mount command makes the contents of
the onboard flash accessible. The next ls shows there now are files in onboard.
These are the contents of the onboard flash, which can be copied to and from like any other file.
This same process should also work if you have booted from the onboard flash. When you are done with the onboard flash, you can unmount it by using this command:
bone$ sudo umount /mnt/onboard
Freeing Space on the Onboard Flash or MicroSD Card
Problem
You are starting to run out of room on your microSD card (or onboard flash) and have removed several packages you had previously installed (Removing Packages Installed with apt), but you still need to free up more space.
Solution
To free up space, you can remove preinstalled packages or discover big files to remove.
Removing preinstalled packages
You might not need a few things that come preinstalled in the Debian image, including such things as OpenCV, the Chromium web browser, and some documentation.
Note
The Chromium web browser is the open source version of Google’s Chrome web browser. Unless you are using the Bone as a desktop computer, you can probably remove it.
Here’s how you can remove these:
bone$ sudo apt remove bb-node-red-installer (171M)
bone$ sudo apt autoremove
bone$ sudo -rf /usr/share/doc               (116M)
bone$ sudo -rf /usr/share/man               (19M)
Discovering big files
The du (disk usage) command offers a quick way to discover big files:
bone$ sudo du -shx /*
12M  /bin
160M /boot
0    /dev
23M  /etc
835M /home
4.0K /ID.txt
591M /lib
16K  /lost+found
4.0K /media
8.0K /mnt
664M /opt
du: cannot access '/proc/1454/task/1454/fd/4': No such file or directory
du: cannot access '/proc/1454/task/1454/fdinfo/4': No such file or directory
du: cannot access '/proc/1454/fd/3': No such file or directory
du: cannot access '/proc/1454/fdinfo/3': No such file or directory
0    /proc
1.4M /root
1.4M /run
13M  /sbin
4.0K /srv
0    /sys
48K  /tmp
1.6G /usr
1.9G /var
If you booted from the microSD card, du lists the usage of the microSD. If you booted from the onboard flash, it lists the onboard flash usage.
The -s option summarizes the results rather than displaying every file. -h prints it in _human_ form–that is, using M and K postfixes rather than showing lots of digits. The /* specifies to run it on everything in the top-level directory. It looks like a couple of things disappeared while the command was running and thus produced some error messages.
Tip
For more help, try du –help.
The /var directory appears to be the biggest user of space at 1.9 GB. You can then run the
following command to see what’s taking up the space in /var:
bone$ sudo du -sh /var/*
4.0K /var/backups
76M  /var/cache
93M  /var/lib
4.0K /var/local
0    /var/lock
751M /var/log
4.0K /var/mail
4.0K /var/opt
0    /var/run
16K  /var/spool
987M /var/swap
28K  /var/tmp
16K  /var/www
A more interactive way to explore your disk usage is by installing ncdu (ncurses disk usage):
bone$ sudo apt install ncdu
bone$ ncdu /
After a moment, you’ll see the following:
ncdu 1.15.1 ~ Use the arrow keys to navigate, press ? for help
--- / ------------------------------------------------------------------
.   1.9 GiB [##########] /var
    1.5 GiB [########  ] /usr
  835.0 MiB [####      ] /home
  663.5 MiB [###       ] /opt
  590.9 MiB [###       ] /lib
  159.0 MiB [          ] /boot
.  22.8 MiB [          ] /etc
   12.5 MiB [          ] /sbin
   11.1 MiB [          ] /bin
.   1.4 MiB [          ] /run
.  40.0 KiB [          ] /tmp
!  16.0 KiB [          ] /lost+found
    8.0 KiB [          ] /mnt
e   4.0 KiB [          ] /srv
!   4.0 KiB [          ] /root
e   4.0 KiB [          ] /media
    4.0 KiB [          ]  ID.txt
.   0.0   B [          ] /sys
.   0.0   B [          ] /proc
    0.0   B [          ] /dev

Total disk usage:   5.6 GiB  Apparent size:   5.5 GiB  Items: 206148
ncdu is a character-based graphics interface to du. You can now use your arrow keys to navigate the file structure to discover where the big unused files are. Press ? for help.
Warning
Be careful not to press the d key, because it’s used to delete a file or directory.
Using C to Interact with the Physical World
Problem
You want to use C on the Bone to talk to the world.
Solution
The C solution isn’t as simple as the JavaScript or Python solution, but it does work and is much faster. The approach is the same, write to the /sys/class/gpio files.
 1////////////////////////////////////////
 2//	blinkLED.c
 3//	Blinks the P9_14 pin
 4//	Wiring:
 5//	Setup:
 6//	See:
 7////////////////////////////////////////
 8#include <stdio.h>
 9#include <string.h>
10#include <unistd.h>
11#define MAXSTR 100
12// Look up P9.14 using gpioinfo | grep -e chip -e P9.14.  chip 1, line 18 maps to 50
13int main() {
14  FILE *fp;
15  char pin[] = "50";
16  char GPIOPATH[] = "/sys/class/gpio";
17  char path[MAXSTR] = "";
18
19  // Make sure pin is exported
20  snprintf(path, MAXSTR, "%s%s%s", GPIOPATH, "/gpio", pin);
21  if (!access(path, F_OK) == 0) {
22    snprintf(path, MAXSTR, "%s%s", GPIOPATH, "/export");
23    fp = fopen(path, "w");
24    fprintf(fp, "%s", pin);
25    fclose(fp);
26  }
27
28  // Make it an output pin
29  snprintf(path, MAXSTR, "%s%s%s%s", GPIOPATH, "/gpio", pin, "/direction");
30  fp = fopen(path, "w");
31  fprintf(fp, "out");
32  fclose(fp);
33
34  // Blink every .25 sec
35  int state = 0;
36  snprintf(path, MAXSTR, "%s%s%s%s", GPIOPATH, "/gpio", pin, "/value");
37  fp = fopen(path, "w");
38  while (1) {
39    fseek(fp, 0, SEEK_SET);
40    if (state) {
41      fprintf(fp, "1");
42    } else {
43      fprintf(fp, "0");
44    }
45    state = ~state;
46    usleep(250000);   // sleep time in microseconds
47  }
48}
Here, as with JavaScript and Python, the gpio pins are referred to by the Linux gpio number. Mapping from header pin to internal GPIO number shows how the P8 and P9 Headers numbers map to the gpio number. For this example P9_14 is used, which the table shows in gpio 50.
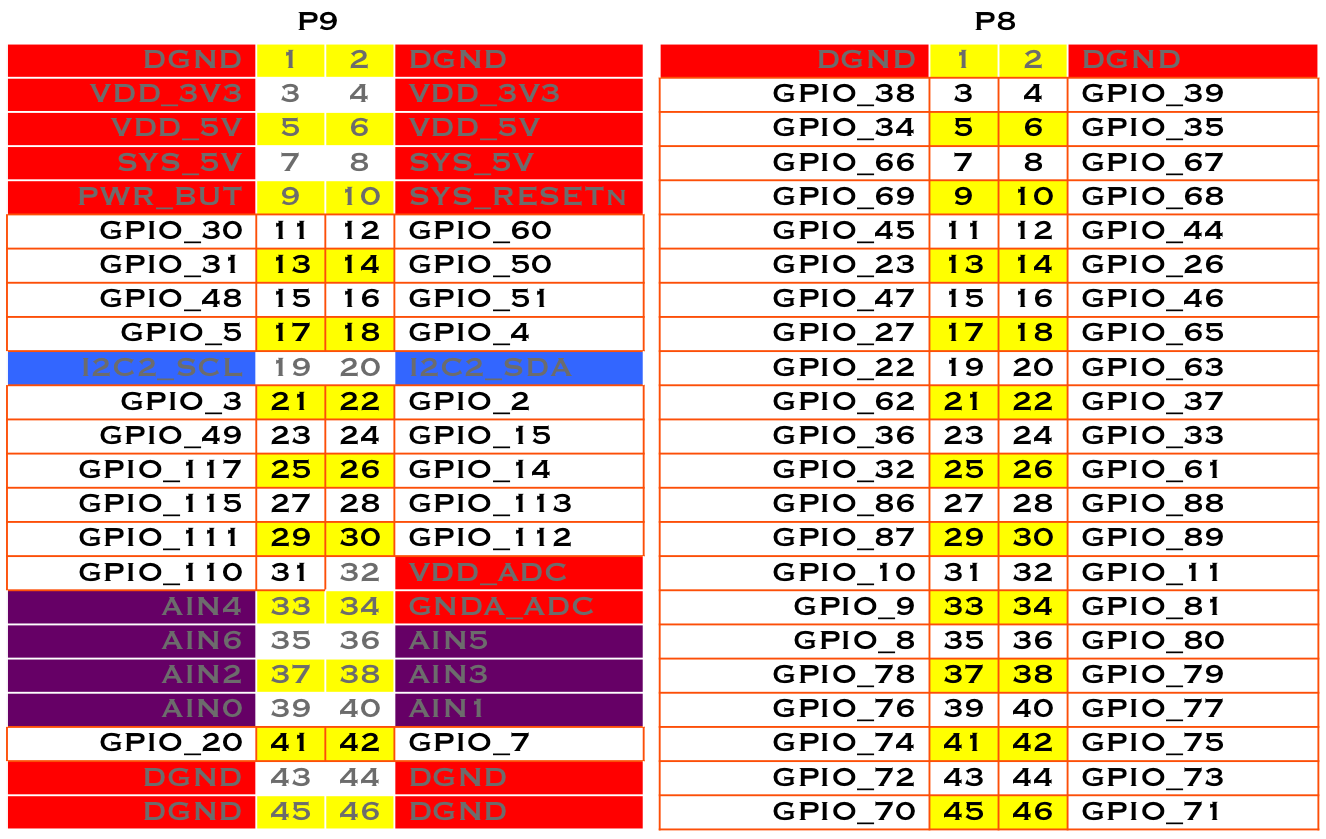
Fig. 404 Mapping from header pin to internal GPIO number
Compile and run the code:
bone$ gcc -o blinkLED blinkLED.c
bone$ ./blinkLED
^C
Hit ^C to stop the blinking.